
Wendy Tries Flower Pounding
With the sun out, warm weather, and longer days, flowers have begun blooming all over the city, making every corner a bright and colorful sight.
Something I’ve seen a lot of this summer on Instagram is a technique called flower-pounding. Inspired by the flowers I’ve been seeing pop up everywhere I go, I just knew we had to try it out! Up until now, I didn’t even know this existed, so I was quite excited to see if this was real or not…
With little to no natural dye knowledge, there are a few terms and definitions we should become familiar with as we dive into the natural dye world.
WOF = Weight Of Fiber: WOF is the dry weight of the fibers being dyed. This is measured before the material is washed, cut, or dyed. Knowing the weight of fiber helps in creating calculations for scouring, mordanting, and dyeing.
Scouring: Scouring is the process of cleaning your materials before starting the mordant/dye process. Scouring is important as it takes out any impurities, dirt, oils, and chemicals during the fabrication process.
Tannin: Tannin is used to help your mordant adhere to cellulose fibers/fabrics. As aluminum acetate doesn’t bond well with plant fibers, using a tannin treatment before the mordant helps create a tannin-fiber complex, allowing the mordant to bond with the fibers.

Mordanting: Mordanting is the most important process of dying as it helps to lengthen the rate of light and wash fastness. It prepares the fibers to accept the dye, ensuring durable, long-lasting colors and even application.
This is a dye fixative that helps to bind dyes on the fabric. It does this by forming a coordination complex with the dye, which then attaches to the fabric.
Without this, the dye will not be as intense and will easily wash out.
Aluminum acetate is a preferred alum mordant for cellulose fibers/fabrics. Aluminum acetate requires a tannin neutralizer beforehand, in order to adhere to the fibers.
Maiwa: A really great resource for learning more about natural dyes, sourcing ready-to-dye material and the dye solution/ingredients to successfully natural dye would be Maiwa.
If you’d like to skip the mordanting process and only do the flower pounding, you can buy already treated fabrics, ready for dying here:
Plants


Flowers that are commonly used: Coreopsis, cosmos, petunias, crown daisies, lilac, pansies
A guide to more natural dye flowers…
Flowers we used: Red mini dianthus, Lily of the Incas, leaves from Lily of the Incas, yellow daisies, ferns
You really can use any flowers or leaves you find around your garden, testing what colours and patterns you can achieve is the most fun part!
Let’s begin…
The Inspiration
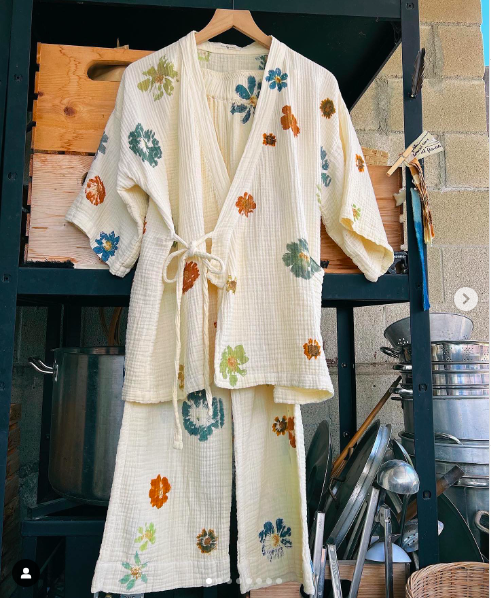
I loved the splayed flower-pounding design done here by @Thedogwooddyer as well as the soft, waffle texture of the cotton gauze.
This apron was also very interesting to me as there are two layers to the skirt, one longer than the other which allowed it to peek through the front flap. I think this would really look interesting using different flowers/plants on each skirt so that there are layers of color and design between the skirts.
Step 1
Scouring:
Cleaning the fibers thoroughly of any residue.
You will need…
Borax
Washing machine
Wash cycle for fabric: we are intentionally staining this fabric, so the stain will hold best with clean, natural fibers.
(Do not use synthetic fibers as they may not take the color, the most natural the better…)
Loosely place your material in the washing machine
Pour a 1/4 cup of borax into the machine.
Run on the longest and hottest setting your machine will allow.
I set mine on a heavy wash load, using hot water, a pre-soak, and an extra rinse to really make sure the material is thoroughly cleaned.Once washed, we can move on to step 2.


Step 2
Tannin:
Tannin bath for 2 hours to prepare cellulose fibers for mordanting.
You will need…
2-4 black tea bags
Hot water
Large bucket
Tongs
Soak the material in a hot water bath with a couple of black tea bags (not too many or it will dye the fabric beige/brown). Black tea has the highest concentration of tannins but might stain the material slightly, so soaking it for about 1 - 3 hours will be enough.
Ensure the tea bags are not touching the material or too close to the fabric as it will dye a darker circle.
It helps to steep the tea for a few minutes before putting the material in and stirring to help avoid this. You can also remove the tea bags once most of the tea has been steeped.Periodically move the material around in the bath making sure it’s fully submerged and freely moving in the bucket.
Carefully remove the fabric with tongs, and thoroughly rinse the material out until the water runs clear.
Dump the tea water and start with fresh water and a clean bucket for the mordant or else the alum will bind to all the tea in the water instead of on your fabric! This would cause the dye to wash out if not properly mordanted.


Step 3
Mordanting:
Mordant overnight with alum acetate.
You will need…
Aluminum Acetate (5% - 10% WOF)
Scale
Hot water
Large bucket or stainless steel pot
Large spoon or whisk (to mix with)
Tongs
And now for the math…
Measure your fabric on a scale. Mine came to 388 grams.
Measure out your aluminum acetate at % x WOF. Wear a mask and measure out in a well-ventilated area to ensure you aren’t breathing in the dust particles.Since we are not dyeing the whole surface of the fabric, I will be using a 6% x WOF.
Dissolve the alum in a cup of boiling hot water, again, staying away from the fumes.
Once dissolved, carefully pour the solution into a large, hot bucket of water and mix.
Add your wet (room temp) fibers to the bucket.
Stir and pop any air bubbles trapped in the fabric, and make sure it is all fully saturated.
Periodically mix in this solution and cover, letting it sit overnight.
Carefully remove the material and rinse out the mordant by hand with gloves on.


Drying:
Air dry fabric flat.
Avoid using a drying machine, as that can reintroduce residues to the fabric that will reduce its ability to take the dye.
At this point your material will feel super stripped and raw, really ensuring the fibers are in a vulnerable state to take the dye.


Pounding
** Before flower pounding, go to steps 1 - 5 in the “Constructing the Apron Dress” section. **

Our set-up
1. Lay down a board, drop cloth, and wax paper to help create a flat, protected surface.
2. Lay your material down.
3. Take your flowers, and cut off any unwanted stems so you are only left with the flower head or petals.
For smaller flowers, I found that laying them down with a bit of their bulb/stem still intact helped me with placing and ensuring the petals didn’t come apart. I then trimmed the flower as it was faced down to help with ensuring the petals would stay in place as these smaller flowers would fall apart once I removed the larger bulb.
4. Open up the flower and place it flatly, face down onto the desired area.
5. Tape down the flower to ensure it stays in place or hold it in place, and continue designing and placing the flowers around your material.
6. Take wax or parchment paper, and place it on top of your material to help hold the flowers down and to protect the dye from transferring.
7. Begin pounding in firm taps, ensuring you aren’t damaging the material or creating a movement with the flower.
8. Gently peel the flower off. I used tape to help remove any excess plant fibers from the material.
9. Repeat all around until all of the design is pounded.
10. Allow to dry fully.
11. Heat set the dye with an iron and a protective fabric in between to protect both the fabric and iron from any run-off dye.


Just keep hammering….


…. And hammering


** Begin the sewing process **
Constructing the apron
1. Using a similar pattern from my Lutterloh, I began drafting out the apron dress.


2. In order to achieve this wrap-around apron with an exposed bottom skirt, I am extending my pattern for the waist to measure 77cm per panel. I then added a 15cm length to one of the skirt panels to create a longer skirt that can peak through the bottom. The shorter skirt measured 56cm with a 1cm seam allowance.
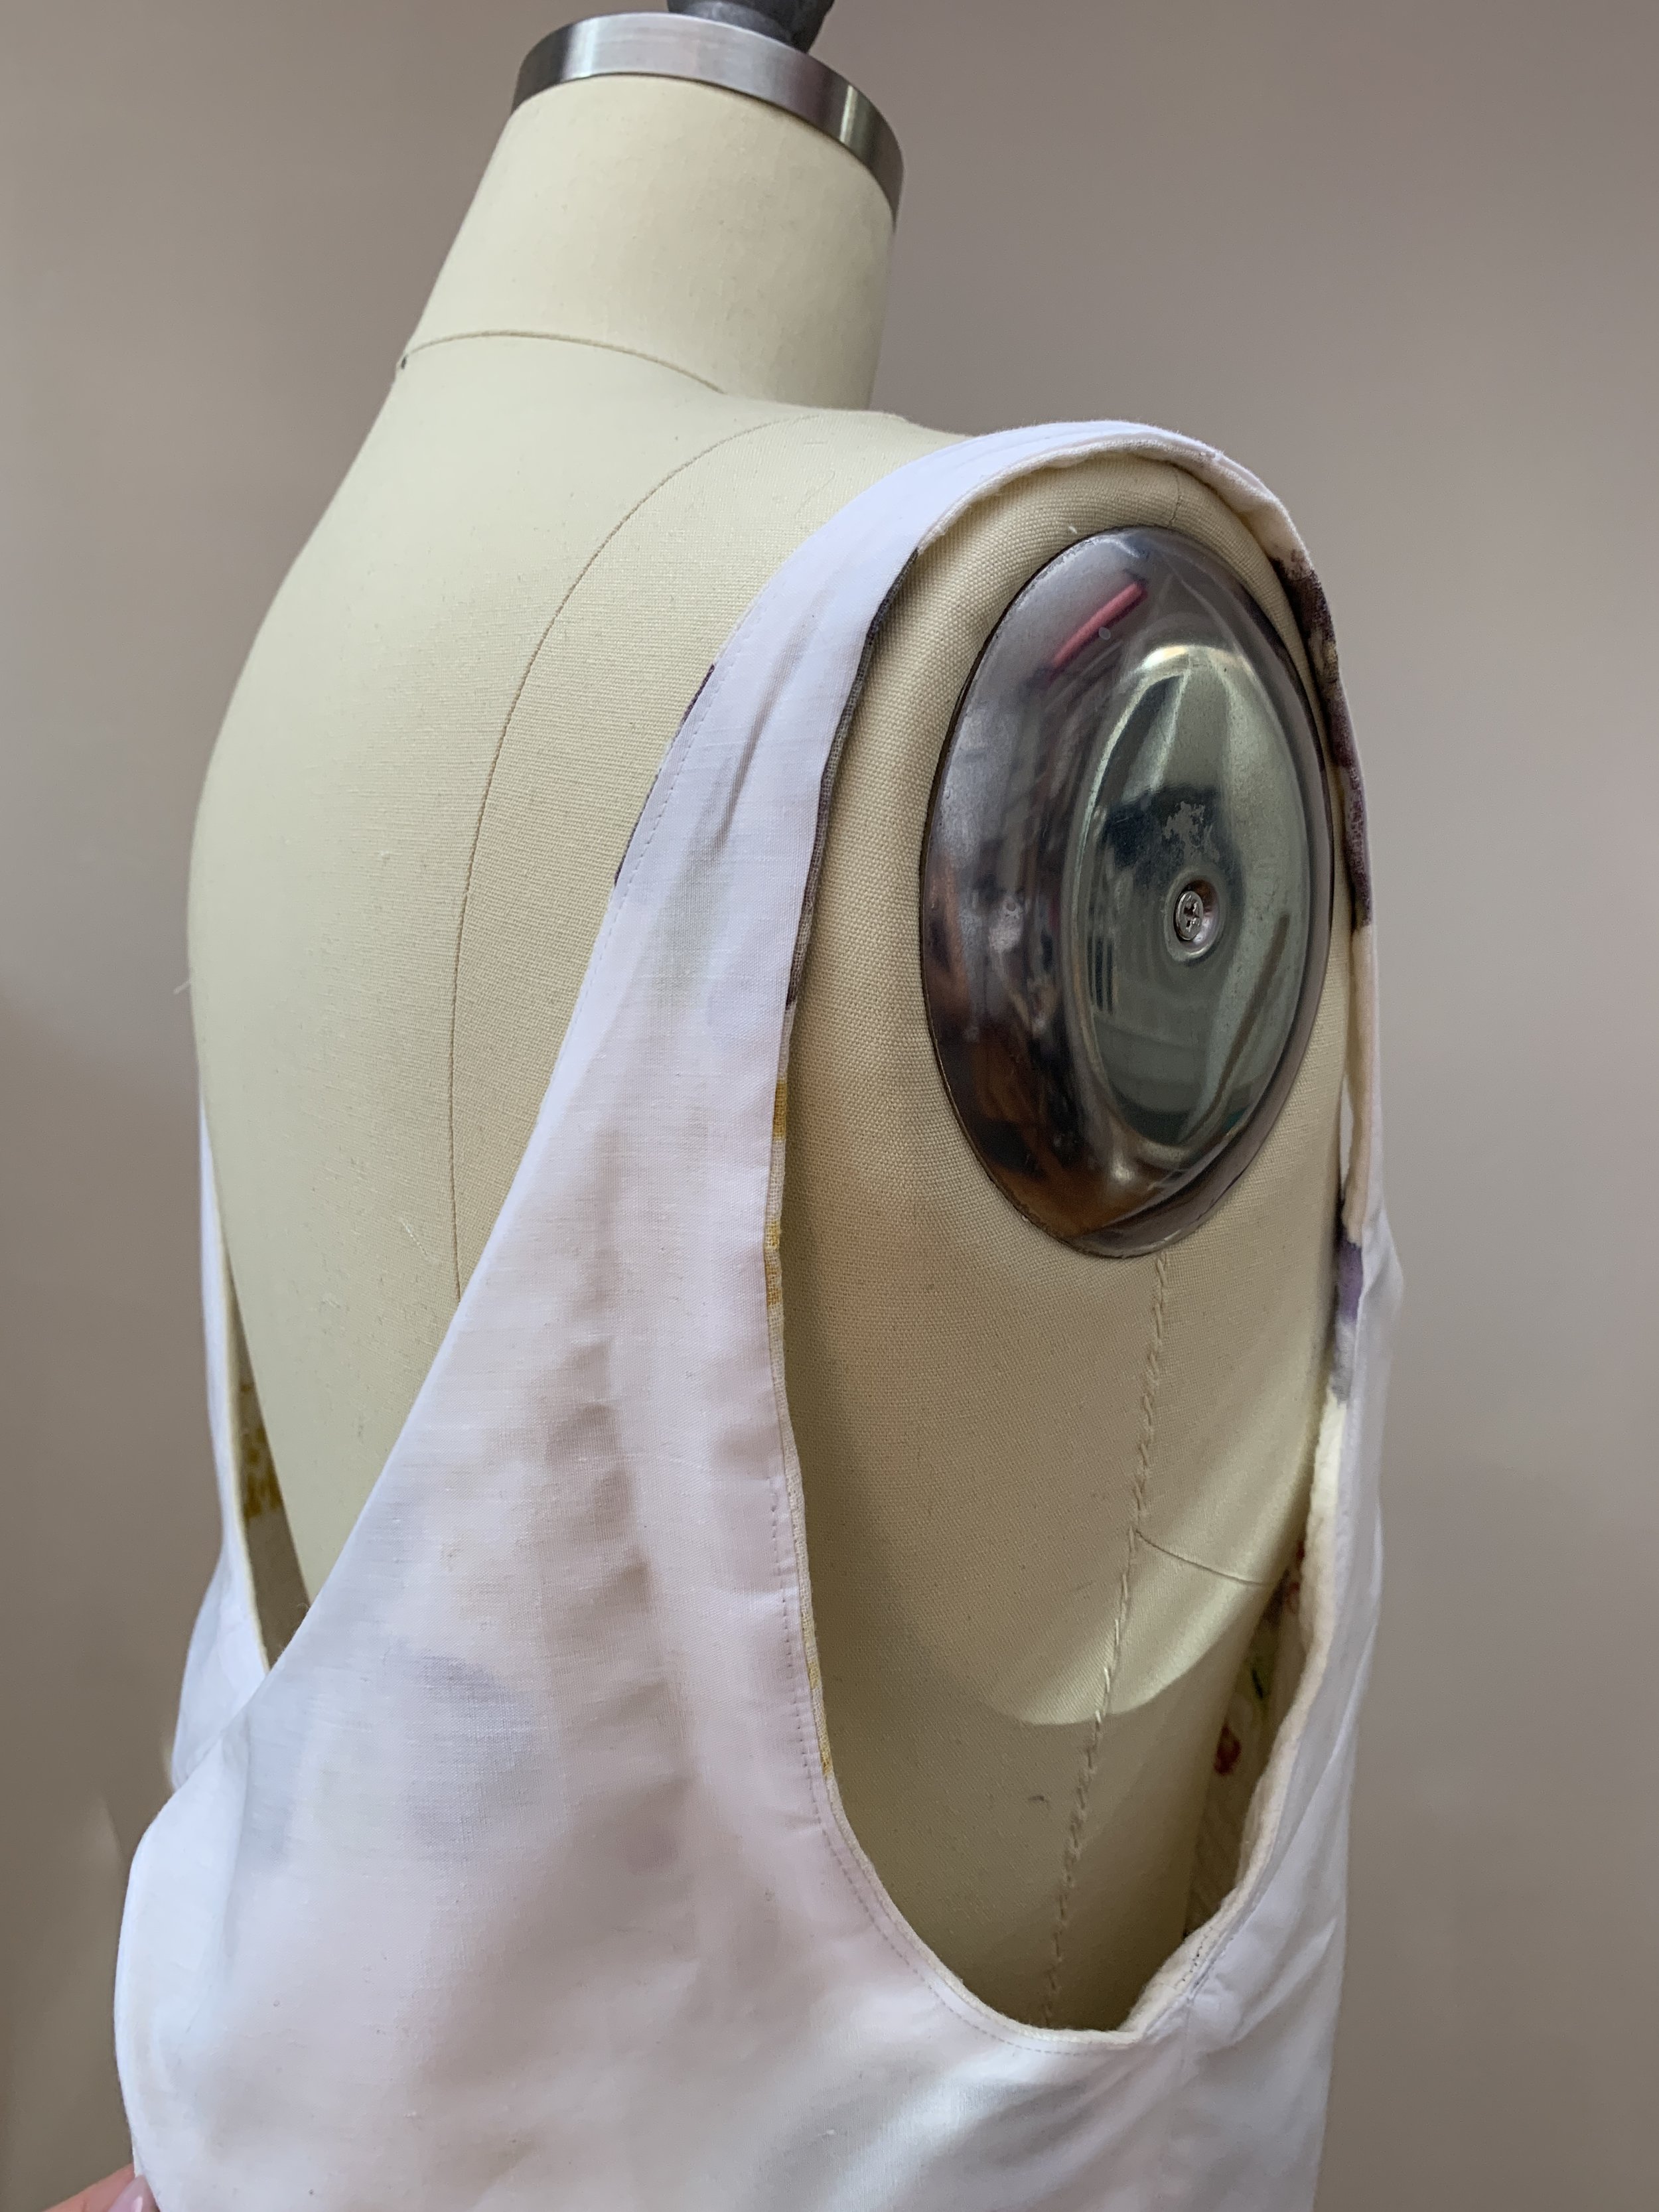
I also adjusted the bodice, giving the neckline a lower, squared cut, larger armholes, and a keyhole, tie back.
Additionally, draft out two ties at 34cm x 3cm.
3. Cut the pattern out in the cotton gauze. Cut a cotton lining for the bodice.
4. Sew the darts on the front bodice pattern. Repeat on lining cotton. Press.
5. Overlock the edges going around each side to avoid fraying during the dyeing process.


** Begin the dyeing process **
6. Once dyed, air dried, and heat set, gather the skirts using a basting stitch.
7. Sew the two edges of the waistband shut, creating a large loop, ready to sandwich the skirts within.
8. Pin the waistband to the skirts, right sides together, starting with one panel and adding the second.
I had a 20cm overlap in the front.
9. Sew the skirts to the waistband, right sides together.
10. Press.


11. Sew the two ties with a 1cm seam allowance. Using a loop turner, turn the ties right sides out and sew one edge of the ties shut.
12. Pin the back ties into the bodice.
13. Taking the cotton lining and cotton gauze, sew the bodice closed at the shoulders and sides, with the right sides together.
14. Press. Flip right sides out.
15. Pin the bodice to the centre of the skirt, right sides together, lining it up ensuring the fit is correct. I had about 27cm excess skirt on either end.
16. Flip the right sides out, fold the unsewn inner edge in the waistband, and begin to stitch in the ditch, sewing the open inner seam of the bodice.
17. Once the bodice is attached, close up the rest of the waistband with a really tight top stitch to the edge.
18. Hand sew 2 snap closures to the dress. Mine were located 10cm from the side seam.
19. Try on and make adjustments as needed.
I ended up shortening the straps on the bodice as the dress hung too low.


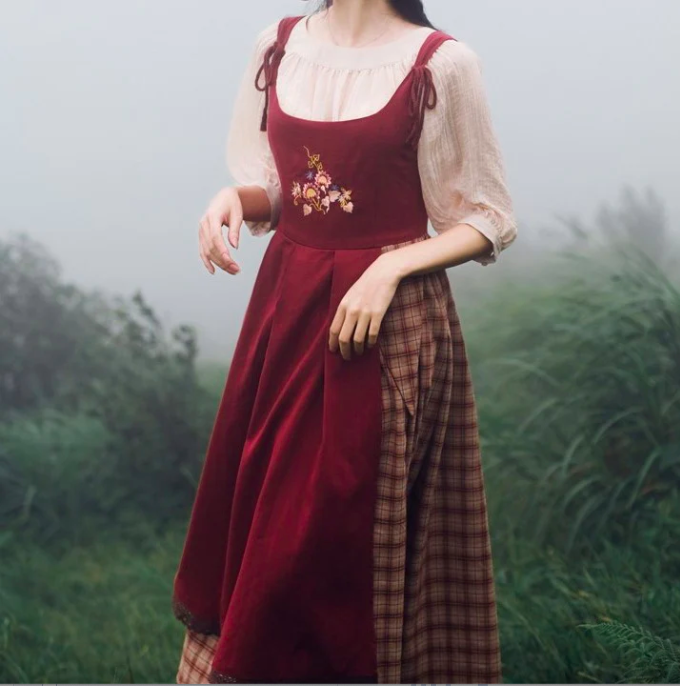
Now for the most fun part…
Prancing in the forest and pretending you’re living in your own little fantastical world!


Resources we found helpful…
Flower-pounding fiber artist with tutorials and helpful tips!
Eco printing with flowers, a similar method to flower pounding
A great resource for sourcing natural dyes, materials and learning more about the process
Scouring cellulose fibers over the stove by the Barefoot Dyer
Helpful information about tannins and why they’re important.
